OTP Login with Phone Number App _ User Guide
Step 1: How To Configure App "General Settings
-
Enable App: First things first—make sure this box is checked to turn on the app's features for your store.
-
Choose OTP Login Methods: Decide how you want to send codes. You can pick Phone, Email, or WhatsApp, or simply select All to give your customers total flexibility.
-
Hide Store Current Login Form: Check these boxes if you want to replace the standard Shopify login form with your new, slick OTP login experience. You can also choose to show this form during checkout or when someone clicks "Buy It Now" to keep the experience seamless.
-
Select OTP Popup Form: We’ve provided a few different templates (Template 1, 2, or 3). Pick the one you like best!. Choose a form template, customize it, and click the Live Preview section on the right to see how it looks.
Add Form Top Heading: Give your login box a friendly title (like "Login with Phone").
Description: Add a quick, helpful note explaining the login process.
Button Label: Choose what the button says (e.g., "Send" or "Get Code").
Upload your Logo: Upload your store logo here to keep everything on-brand.
- Update Profile: Enable this if you want to allow customers to update their profile info through the app.
Resend Code Button Label: You can rename the "Resend" button to whatever fits your store's voice.
Set Code Expiry Time: Use the slider to decide how long a code stays valid. Setting it to 2 minutes is a great balance between security and convenience.
Choose OTP Country List: If you have international customers, keep this set to "All Countries" so anyone can use your login, no matter where they are.
Redirect After Login: Where should your customers go once they’ve successfully logged in? You can send them back to the Home page, or choose another specific page that makes sense for your store.
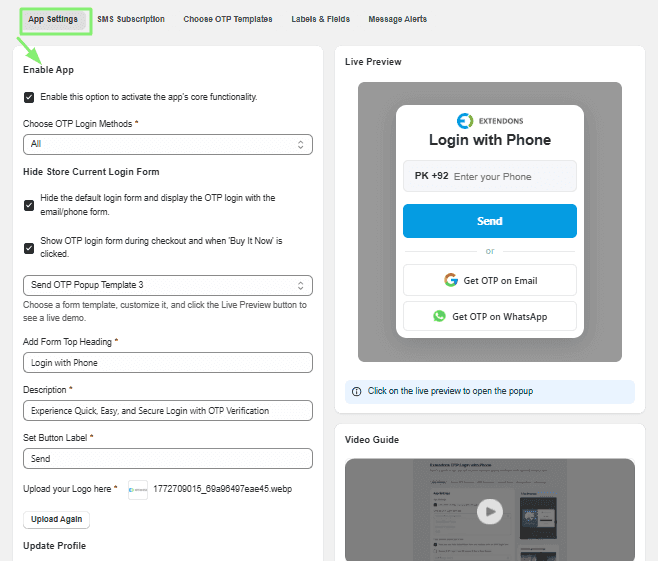
Once you've made your changes, click the Save button at the bottom of the page to push your new settings live!
Step 2: Customize the SMS Subscription
Here you can customize the "Load More" button's color, text, and size, which will be displayed on collection pages to load more products.
Step 3: Customizing Your OTP Templates
This section lets you fine-tune exactly what your customers see when they sign up or log in. You can customize the look for Phone, Email, and New Account forms.
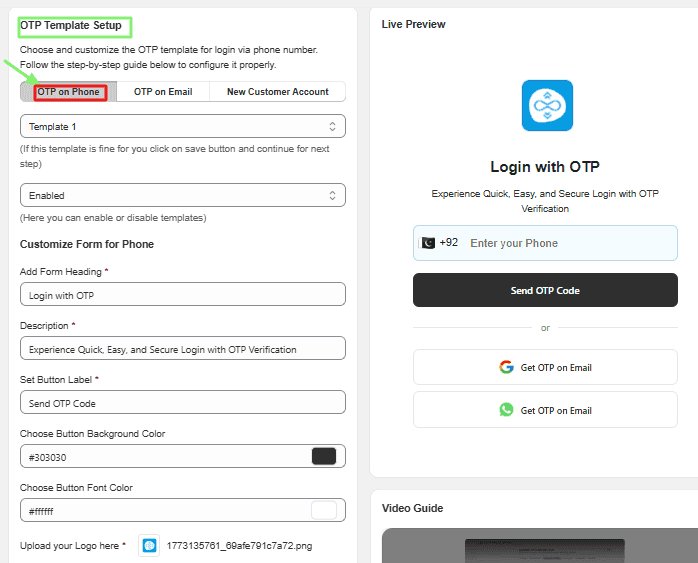
1. OTP on Phone Configure the popup for phone-based logins:
- Template & Status: Select your preferred template style and ensure it is set to Enabled.
- Form Customization: Edit the Form Heading, Description, and Button Label to match your brand.
- Styling: Use the color pickers to set your Button Background and Font Colors, and upload your Store Logo for a professional touch.
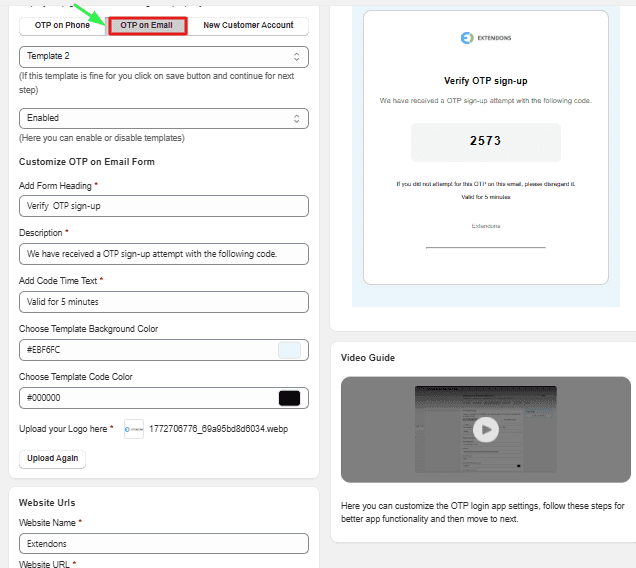
2. OTP on Email Customize the experience for customers logging in via email:
- Template & Status: Choose your design and ensure it is Enabled.
- Form Details: Add your custom Heading, Description, and Code Expiry text.
- Branding: Set your background/font colors and upload your logo.
- Website & Socials: Enter your Website Name and URL, and add links to your social media profiles (Facebook, Instagram, LinkedIn, YouTube) to help customers connect with you.
3. New Customer Account Control the registration fields for new users:
- Field Labels & Placeholders: Customize the names and "helper text" (placeholders) for First Name, Last Name, Email, and Phone Number.
- Hide Fields: If you don't need certain information, check the "Hide" box for First or Last Name to simplify the form.
- Button Customization: Set the Button Label (e.g., "Create Account") and choose your preferred Button Color.
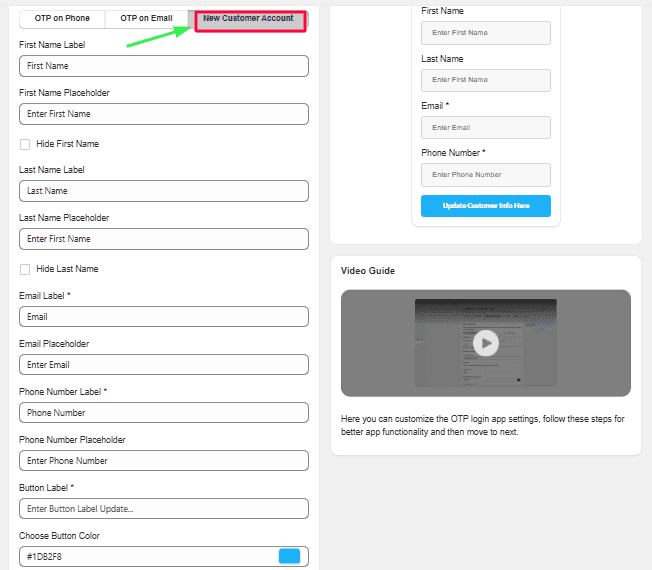
Don't forget to click the Save button at the bottom of each tab to apply your changes!
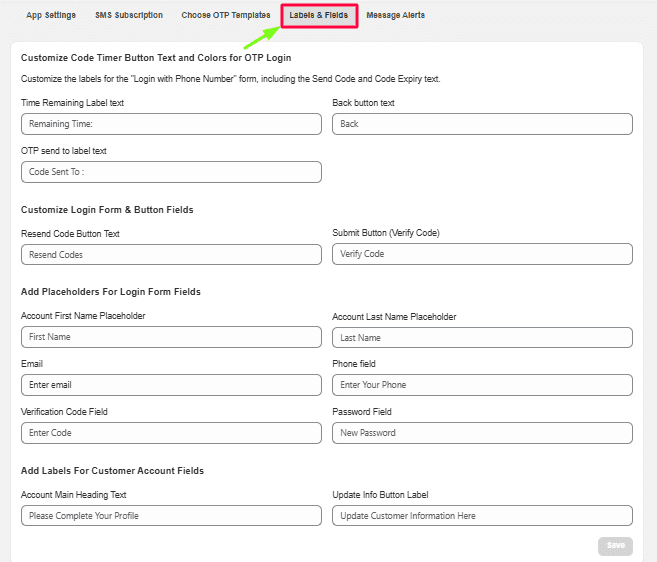
Step 4: Customizing Labels & Fields
This section allows you to personalize the text and labels within your login and account forms.
1. Code Timer & Login Form Labels
Customize the instructional text displayed during the OTP login process:
-
Time Remaining Label: Set the text for the countdown (e.g., "Expires in:")
-
Back Button Text: Define the label for the button that returns users to the previous screen.
-
OTP Sent To Label: Update the confirmation message (e.g., "Code sent to:").
2. Login Form & Button Fields
- Resend Code Button Text: Rename the "Resend" button to fit your store's tone.
- Submit Button (Verify Code): Set the text for the button that verifies the code.
3. Placeholders Update the "hint" text displayed inside your input fields to guide your users:
-
Account First & Last Name Placeholders: Set the example text for name fields.
-
Email & Phone Field Placeholders: Define the instructional text for contact fields.
-
Verification Code & Password Fields: Update the placeholder text for these security inputs.
4. Customer Account Settings Manage the labels used on your broader account pages:
-
Account Main Heading Text: Set the title for your account forms.
-
Update Info Button Label: Set the text for the button customers click to save changes (e.g., "Save Changes").
Step 5: Setting Up Custom Message Alerts
This section allows you to customize the notifications your customers see during the login process.
Customizing Your Message Alerts You can personalize the following alerts:
-
Phone & Code Errors: Customize the error messages for invalid phone numbers or incorrect authentication codes.
-
Verification Status: Set the message that appears when a code is successfully sent to a phone or email.
-
Timeouts & Warnings: Define the message displayed when a code expires or if a user makes too many login attempts.
-
Account Actions: Update the confirmation text for account activation and password updates.
-
Email Errors: Customize the alert for an invalid email address.
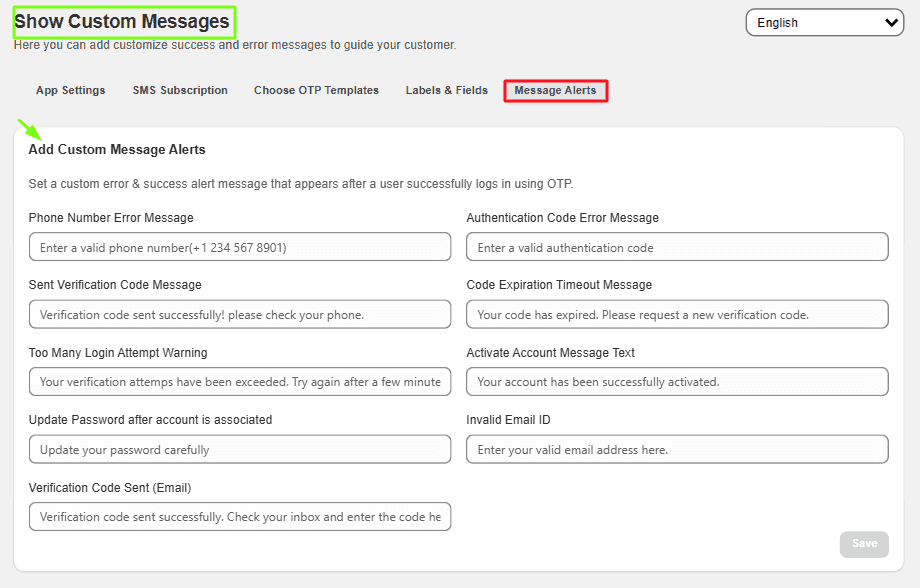
Don't forget to click the "Save" button at the bottom of the page to apply your changes!
Step 6: App Embeds
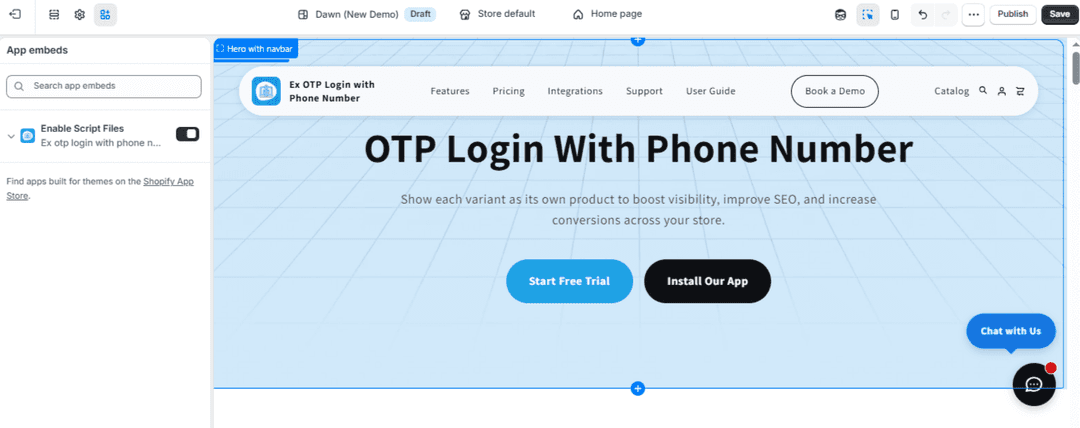
To enable the OTP Login with Phone Number app on your storefront, you must activate its App Embed within your Shopify theme settings.
Steps
- Go to Shopify Admin.
- Navigate to Online Store → Themes.
- Click Customize on your active theme.
- Open App Embeds from the left sidebar.
- Locate Enable Script Files for OTP Login with Phone Number.
- Toggle Enable ON.
- Click Save.