Step 1: How To Configure App "General Settings
-
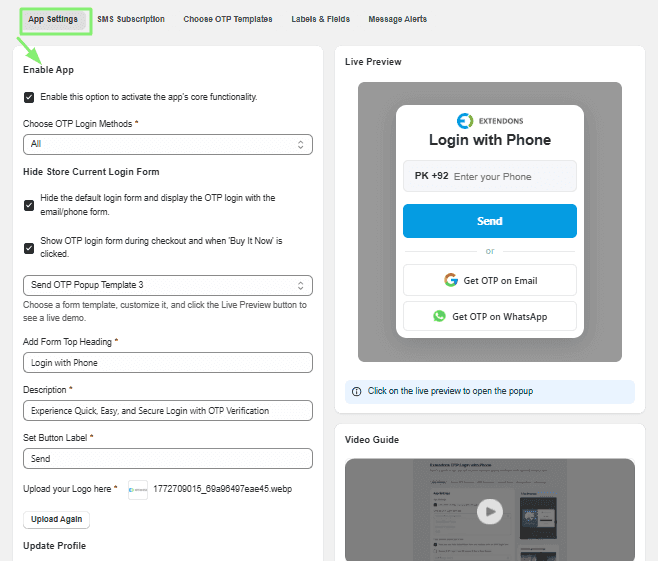
Enable App: First things first—make sure this box is checked to turn on the app's features for your store.
-
Choose OTP Login Methods: Decide how you want to send codes. You can pick Phone, Email, or WhatsApp, or simply select All to give your customers total flexibility.
-
Hide Store Current Login Form: Check these boxes if you want to replace the standard Shopify login form with your new, slick OTP login experience. You can also choose to show this form during checkout or when someone clicks "Buy It Now" to keep the experience seamless.
-
Select OTP Popup Form: We’ve provided a few different templates (Template 1, 2, or 3). Pick the one you like best!. Choose a form template, customize it, and click the Live Preview section on the right to see how it looks.
Add Form Top Heading: Give your login box a friendly title (like "Login with Phone").
Description: Add a quick, helpful note explaining the login process.
Button Label: Choose what the button says (e.g., "Send" or "Get Code").
Upload your Logo: Upload your store logo here to keep everything on-brand.
- Update Profile: Enable this if you want to allow customers to update their profile info through the app.
Resend Code Button Label: You can rename the "Resend" button to whatever fits your store's voice.
Set Code Expiry Time: Use the slider to decide how long a code stays valid. Setting it to 2 minutes is a great balance between security and convenience.
Choose OTP Country List: If you have international customers, keep this set to "All Countries" so anyone can use your login, no matter where they are.
Redirect After Login: Where should your customers go once they’ve successfully logged in? You can send them back to the Home page, or choose another specific page that makes sense for your store.
Once you've made your changes, click the Save button at the bottom of the page to push your new settings live!