App Userguide - For Premium Plan
App Settings
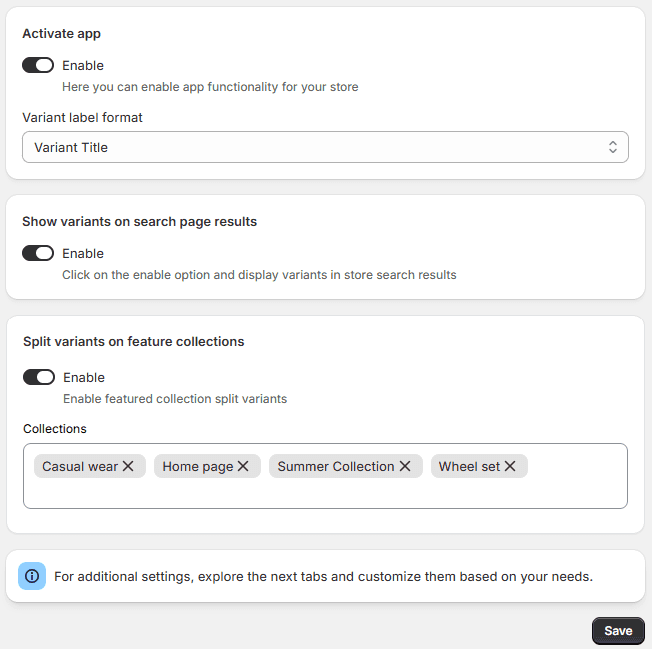
Activate App
Enable the core functionality of the app to start displaying individual product variants across your storefront.
- Enable Toggle: Switch this on to activate the app’s script and start splitting your variants on collection pages.
- Variant Label Format: Customize how the product title and variant options are displayed to customers.
Example: Selecting Product Title - Color will dynamically update your product card headings (e.g., “Classic T-Shirt - Blue”).
Show Variants on Search Page Results
Extend the app’s functionality beyond standard collection pages to cover your store’s built-in search engine.
-
Enable Toggle: Turn this option on to automatically split and display individual product variants whenever a customer uses your store’s search bar. This ensures a consistent browsing experience and maximizes product visibility.
-
Show variants on featured collections: here you can enable and select the featured collection for display variants as a separate product on the homepage.
Split Variants with multiple Options
Take full control over your storefront presentation by specifying exactly which option groups (e.g., color, size, material) split into individual product cards, and which options should be grouped or excluded entirely.
- Select Options to Split: Choose the specific product attributes that should trigger a fresh product card on your collection pages.
- Flexibility: You can choose and split variants by color, size, or multiple custom attributes depending on how you want to showcase your inventory.
- Choose Variants Exclude Split Options: Clean up your collection layout by preventing specific attributes from splitting your product grid.
- Enable Toggle: Switch this on to activate your exclusion filter logic.
- Select Options to Exclude: Pick the specific options you want the app to ignore when separating items.
Example: If you choose to split by Color but have multiple sizes for each color, you should add Size to this exclusion list. This ensures your collection page shows one card per color instead of a repetitive card for every single size variation (e.g., Small, Medium, Large) of that same color.
Re-arrange or Shuffle the Variants
Inject variety into your storefront to optimize browsing engagement.
- Enable Toggle: Turn this on to randomize and dynamically mix the order of your split variants on collection pages. This gives returning customers a fresh visual layout every time they browse your store instead of seeing the exact same variants in the exact same sequence.

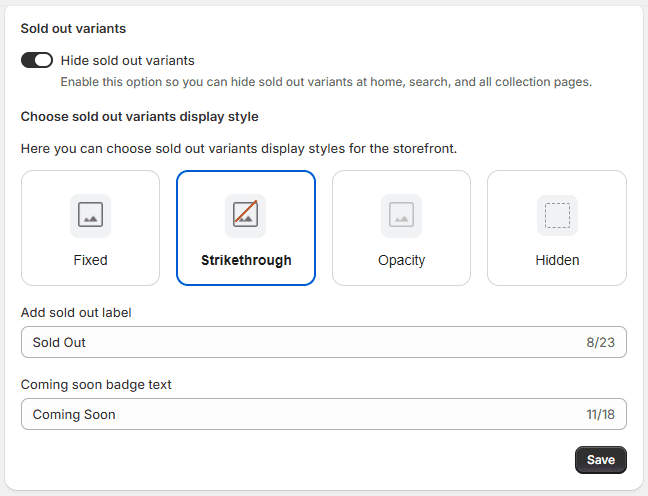
Hide Sold Out Variants
Manage how out-of-stock items appear on your homepage, search results, and collection grids to maintain a clean shopping experience.
- Hide Sold Out Variants Toggle: Turn this on to immediately remove all out-of-stock variants from your storefront browsing pages.
- Choose Sold Out Variants Display Style: Select how out-of-stock items look if they remain visible on your collection pages:
Fixed: Keeps the standard display card layout unchanged.
Strikethrough: Crosses out the product details or pricing to visually flag it as unavailable.
Opacity: Fades out the product card image and text to make it look semi-transparent.
Hidden: Completely hides the item from the customer grid view.
Add Sold Out Label: Customize the text tag displayed over out-of-stock variants. (e.g., "Sold Out", "Out of Stock" - Max 23 characters).
Coming Soon Badge Text: Customize the badge text for upcoming inventory drops. (e.g., "Coming Soon", "Back Soon" - Max 18 characters).
Save Button: Click to instantly apply your out-of-stock styling changes to your live store.
Customize Add to Cart Button
Streamline the purchase process by letting customers add specific variants directly to their cart without needing to click through to the product page.
- Enable Toggle: Turn this option on to inject an “Add to Cart” button onto each individual variant card across your collection pages.
- Add Button Label: Customize the text displayed on the button to match your brand’s voice.
- Examples: “Add to Cart”, “Add to Bag”, or “Buy Now”. (Character limit: 23 characters).
- Choose Add to Cart Button Text Color: Select or paste a hex code (e.g., #ED07CF) to change the color of the text inside the button.
- Choose Add to Cart Button Color: Select or paste a hex code (e.g., #28154C) to customize the background color of the button so it perfectly matches your store’s theme design.
- Save Button: Click this to apply and publish your button customization changes to your live storefront.
Display Price Ranges & Infinite Scroll
Control how pricing values are displayed on split variant cards and customize the pagination style for customers browsing your collections.
- Select How Variant Prices are Displayed: Choose the pricing layout for your split variant cards using the dropdown menu.
- Options include: Regular Price to display the exact price of that individual variant, or custom price range layouts. Its support multiple format’s minimum price, maximum price, minimum price & maximum price and custom format
- Apply Price Ranges for Selected Collections Here: Search and select specific collections if you only want to show range pricing (e.g., "$10 - $25") on certain product groupings rather than storewide.
Infinite Variants Scroll on Collections
Enable seamless browsing by replacing traditional page numbers with modern infinite scrolling or a manual "load more" feature.
- Enable Scroll Options Toggle: Turn this on to override standard page numbers and activate custom scrolling mechanics and loading animations.
- Choose Infinite Options for Products: Select your preferred loading method from the dropdown:
Infinite Scroll: Automatically triggers and appends the next batch of variants as the customer scrolls down the page.
Load More: Adds a button at the bottom of the variant grid that customers can click to pull up more items manually.
- Animation Type: Pick an animation style from the dropdown menu to control how newly loaded variant cards visually slide, fade, or pop into view as the customer scrolls. Select No animation for a standard, immediate load layout.
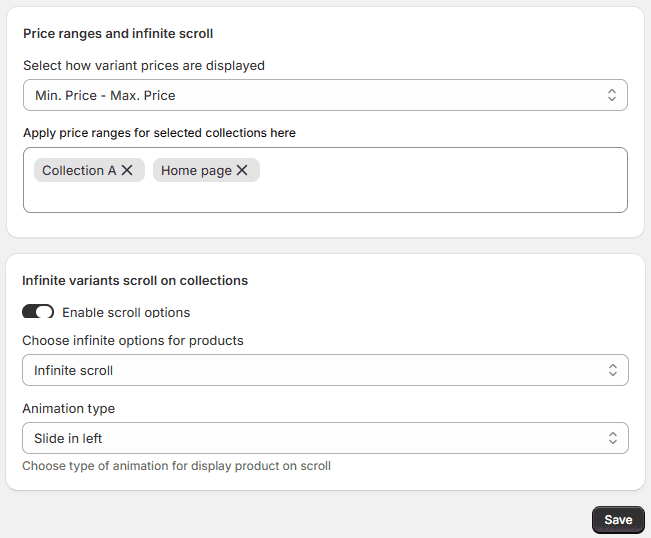
- Save Button: Click to store and activate your pricing structure and pagination configuration on the storefront.
Smart Sorting & SEO
Optimize your search rankings with clean URLs and boost sales by automatically showcasing your best-selling variants first.
SEO Friendly URLs
- Enable SEO-friendly URLs Toggle: Turn this on to replace clunky query links (e.g., ?variant=123) with clean, indexable paths (e.g., /products/handle-option) for better search engine ranking.
- Keep Existing SEO Redirects Checkbox: Check this to preserve active store redirects, preventing broken links ($404$ errors) and saving search performance.
Smart Variant Sorting
- Enable Smart Variant Sorting Toggle: Turn this on to automatically push your highest-converting variants to the front of collection pages based on sales history.
- Sales Look-Back Window: Select the timeframe of order history used to calculate top sellers (e.g., Last 60 days).
- Top Variants to Prioritize: Choose the total number of top-performing items to pull to the front of the grid.
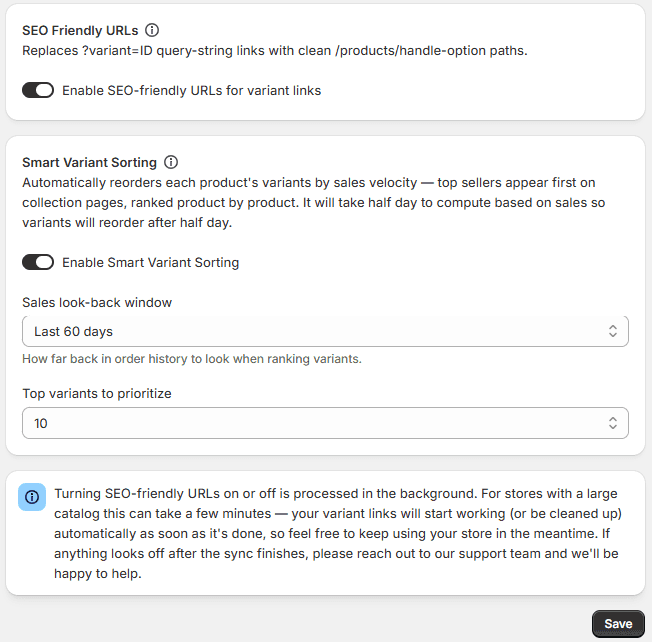
Save Button: Click to apply your SEO and automated sorting settings live.
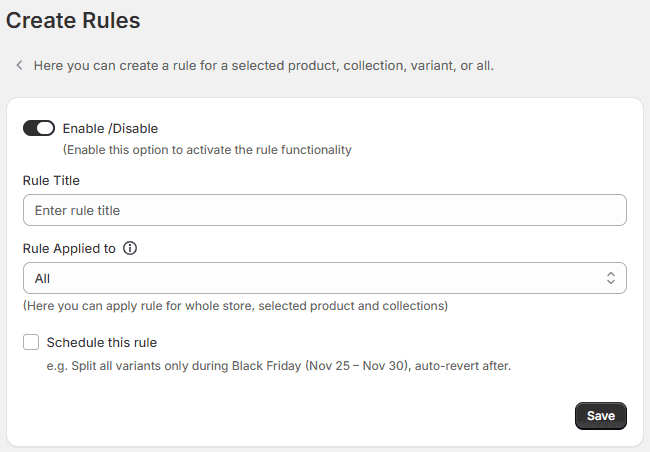
How to Create Rules and Manage
Set up custom rules to control precisely which products, collections, or individual variants are split on your storefront. This allows you to apply different splitting logic across your store instead of a simple sitewide setting.
- Enable / Disable Toggle: Switch this on to activate the specific rule functionality you are configuring. If turned off, the rule will be saved but will not affect the storefront.
- Rule Title: Enter an internal name for your rule to easily manage it later in your dashboard. Example: “ sale collection ”
- Rule Applied To: Use this dropdown menu to define the scope of your custom rule. You can target your split logic by selecting one of the following options:
All: Applies the splitting rules globally to every single product and collection in your store.
Products: Targets specific individual products that you select.
Product Variant: Narrows the scope down to individual, highly specific product variants.
- Collection Level Rule: In a collection-level rule, you can create a single rule for each collection. Once you select a collection, product sorting options and multiple filter condition logic appear below along with the products.
- Custom Sorting: You can easily drag and drop variant positions within collections. You can also assign a display order using numeric values, which will be reflected at the collection level accordingly.
- Add Condition (Apply Filters): This option is available in the backend for admin convenience. It helps display selected variants from large collections and makes sorting easier.
- Show Results Filters: Admins can view 100 to 1000 variants using filter views. They can also sort results alphabetically, by price (low to high), and more.
- Schedule This Rule: You can schedule variants to appear later if they are not out of stock or are expected to be restocked soon. You can make them live automatically by selecting specific dates. For example, you can split a seasonal collection from June 1 to August 31 and automatically disable it outside that window.