VAT Dual Pricing App – User Guide
This guide is designed to help you get your VAT pricing up and running quickly. By following these steps, you can ensure your customers have full transparency regarding tax-inclusive and tax-exclusive pricing on your storefront.
Step 1: Configure General Settings
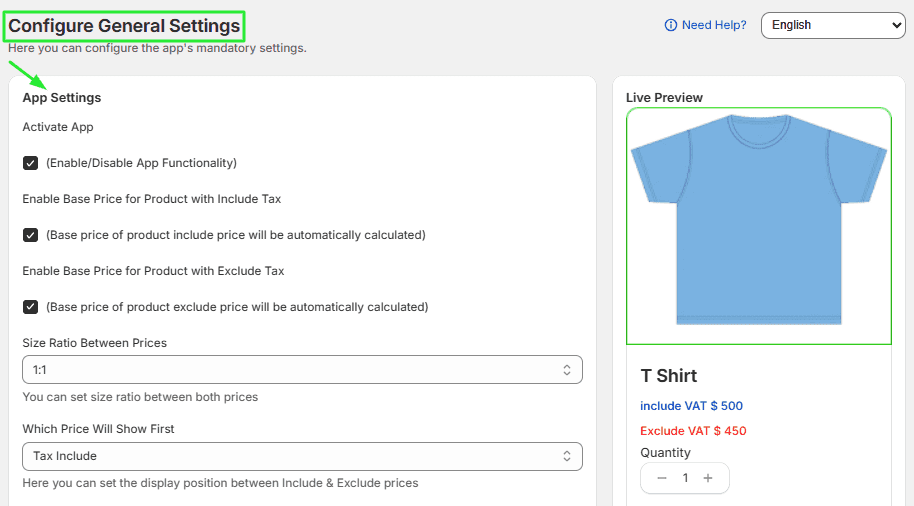
The General Settings section allows you to control how VAT-inclusive and VAT-exclusive prices are displayed on your store.
Activate App:
Check this box to enable the app’s functionality across your store. If you ever need to revert to default Shopify pricing, simply uncheck this box.
-
Enable Base Price for Product with Include Tax: Check this box to automatically calculate and display the price of your products including VAT.
-
Enable Base Price for Product with Exclude Tax: Check this box to automatically calculate and display the price of your products excluding VAT.
-
Size Ratio Between Prices: Use this field to determine the visual balance between the two prices (e.g., 1:1). This helps maintain a clean, professional look on your product pages.
-
Which Price Will Show First: Use the dropdown menu to decide whether the "Tax Include" or "Exclude Tax" price appears at the top of the price stack.
Step 2: Customize Labels & Colors
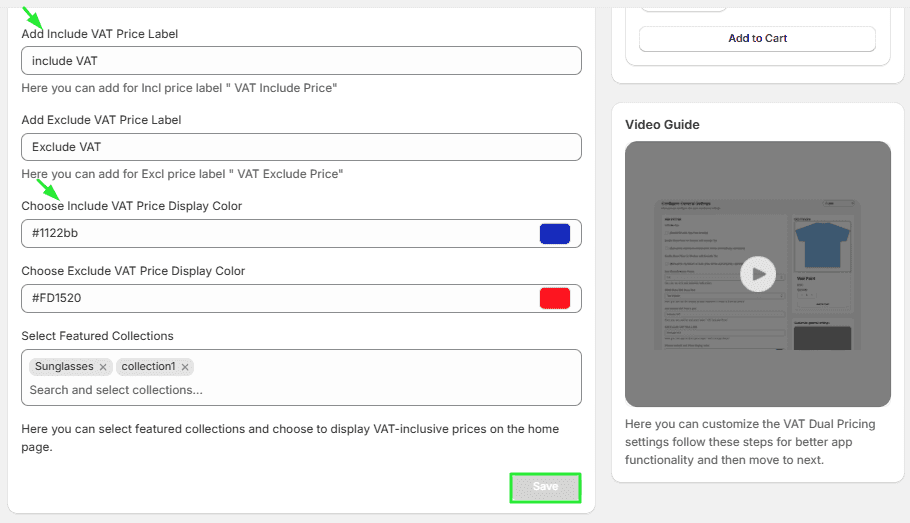
You can customize how pricing labels and colors appear on your storefront.
- Add Include/Exclude VAT Price Labels: Customize your labels (e.g., "Include VAT" or "Exclude VAT"). These labels help your customers clearly understand the difference between the two prices shown.
- Choose Price Display Colors: Click the color pickers to select specific colors for your Include and Exclude VAT prices.
- Select Featured Collections: Click inside the box to search for and select specific collections. By doing this, you ensure that the VAT dual pricing is activated specifically on those pages.
Step 3: How to Create Rules
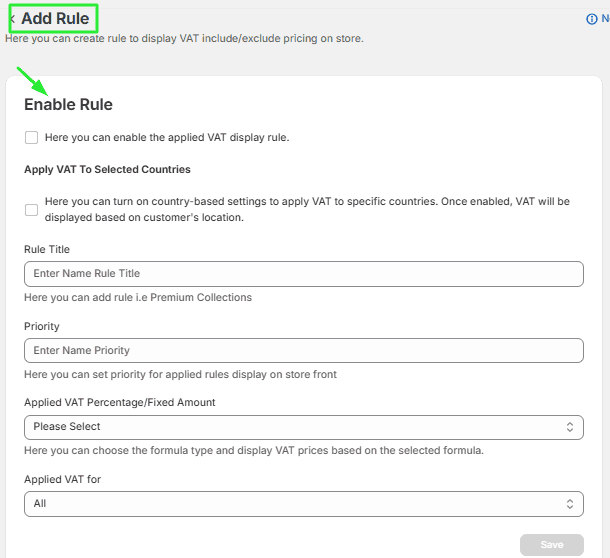
The Rules feature allows you to apply custom pricing logic to specific products or collections.
To create a new rule:
Go to the Rules tab in the app dashboard and click on "Add Rule."
Once you are in the rule editor, configure the following:
-
Enable Rule: Check this box to activate the specific rule you are creating.
-
Apply VAT To Selected Countries: Check this box if you want the VAT rules to be location-specific. Once enabled, the app will automatically detect your customer's location and apply the corresponding tax display rules accordingly.
-
Rule Title: Enter a name for the rule to easily identify it.
-
Set Price or Percentage: Define pricing adjustments for selected items. Set a fixed price or percentage Apply for VAT included and excluded pricing
-
Rule Applied To: Choose where the rule will be applied:
All Products Specific Products Collections
-
Rule Priority: Set priority when multiple rules apply, Lower values (e.g., 0) have higher priority.
-
Save Rule: Click Save to apply the rule settings.
Step 4: Enable App Embed (Activate on Theme)
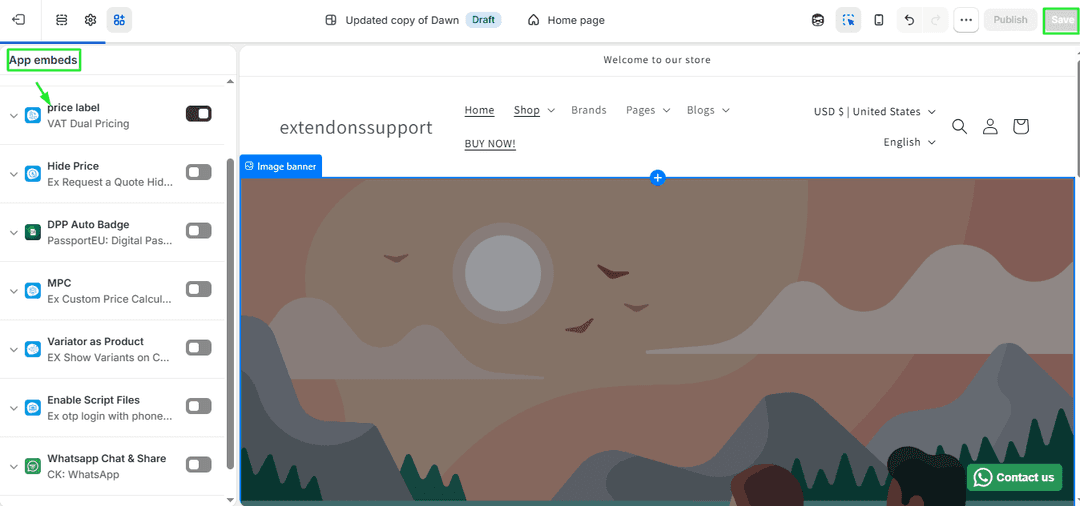
To display dual pricing on your storefront, you must enable the app in your theme.
Steps to Enable App Embed
- Go to Shopify Admin.
- Navigate to Online Store → Themes.
- Click Customize on your active theme.
- Open Theme Settings → App Embeds.
- Locate VAT Dual Pricing App.
- Toggle Enable ON.
- Click Save.
Setup Complete
After completing these steps:
- VAT-inclusive and VAT-exclusive prices will be displayed
- Labels and colors will match your branding
- Rules will apply custom pricing logic
- The app will be active on your storefront
Your store is now ready to present clear and flexible dual pricing to customers.